Showing posts with label tutorial. Show all posts
Showing posts with label tutorial. Show all posts
Wednesday, December 7, 2016
Format Factory Version 2 70 Tutorial Untuk Mengubah Format Video Menjadi MP4
Format Factory Version 2 70 Tutorial Untuk Mengubah Format Video Menjadi MP4
Tutorial ini berguna bagi agan-agan yang pengen nonton video di BB atau di ponsel agan tapi file video yang agan miliki tidak support di putar di player handset agan. Aplikasi yang digunakan untuk convert videonya adalah Format Factory, aplikasinya simple untuk digunakan. Sekilas tentang format factory:
Format Factory is a multifunctional media converter. Provides functions below:
- All to MP4/3GP/MPG/AVI/WMV/FLV/SWF.
- All to MP3/WMA/AMR/OGG/AAC/WAV.
- All to JPG/BMP/PNG/TIF/ICO/GIF/TGA.
- Rip DVD to video file , Rip Music CD to audio file.
- MP4 files support iPod/iPhone/PSP/BlackBerry format.
- Supports RMVB,Watermark, AV Mux.
Format Factorys Feature:
1 support converting all popular video,audio,picture formats to others.
2 Repair damaged video and audio file.
3 Reducing Multimedia file size.
4 Support iphone,ipod multimedia file formats.
5 Picture converting supports Zoom,Rotate/Flip,tags.
6 DVD Ripper.
7 Supports 56 languages
OS requirements: All Windows OS
1 support converting all popular video,audio,picture formats to others.
2 Repair damaged video and audio file.
3 Reducing Multimedia file size.
4 Support iphone,ipod multimedia file formats.
5 Picture converting supports Zoom,Rotate/Flip,tags.
6 DVD Ripper.
7 Supports 56 languages
OS requirements: All Windows OS
Download Format Factory Version 2.70

Langsung aja yuk kita praktekin tutorialnya.
- Setelah download kemudian install aplikasi format factorynya (ga usah dijelasin ya cara install nya, kalo ga bisa kebangetan)
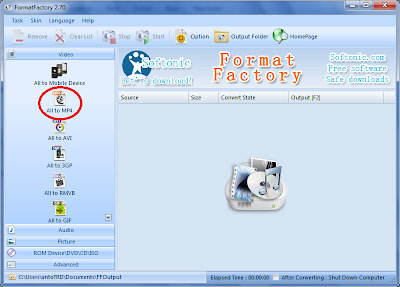
- Jalankan aplikasi format factory, klik yang sudah saya lingkarin merah
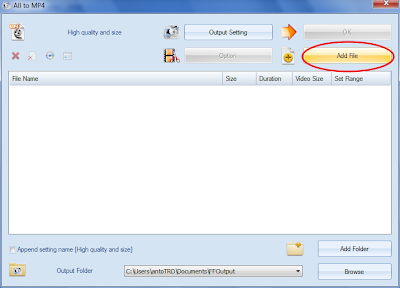
- Klik add file dan pilih videonya yang akan agan ubah ke mp4
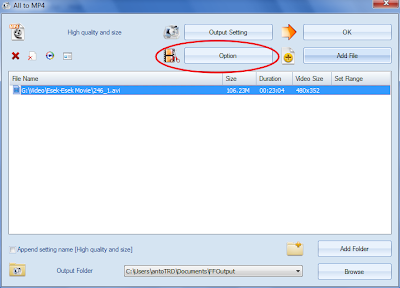
- Setelah pilih file silahkan tekan menu OPTION
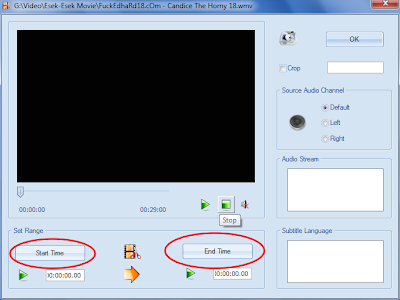
- Kemudian akan muncul menu berikut, pilih durasi yang agan inginkan kemudian tekan OK
- Kemudian setelah itu pilih START
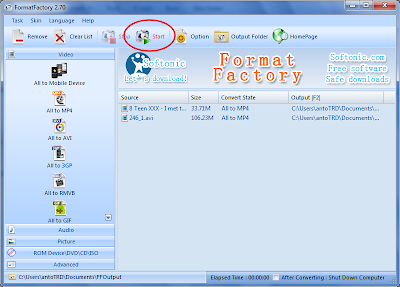
- Tunggu prosesnya sampai selesai
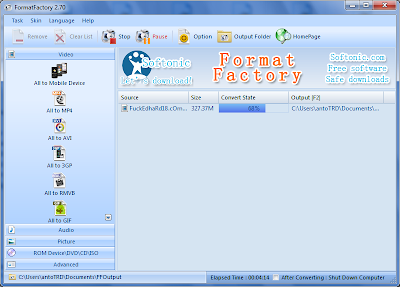
Available link for download

Sunday, September 18, 2016
FULL TUTORIAL SpyNet 2 7
FULL TUTORIAL SpyNet 2 7
! I can not be responsible for possible damage after using this software!
 |
| ultimate-hacker.blogspot.com |
Hello, First of all, disable your antivirus software because it is naturally considered a TROJAN.Une extracted once I advise you to configure your antivirus to ignore the issue of its Net_RAT_v26 Spt-SCAN if you are good to re- extract. RAR because the virus will delete the SpyNet.exe (the application). First, download the software SpyNet 2.6 to the address below and extract it on your desktop:
Here is the file SpyNet RAT 2.6
Once extracted to your desktop, you will see its contents: File-Save (the three languages ??available for the software) Record-profile (or find the profiles of "Servers" you will create. For info, you have already created two basic but better to create one as explained below).
Record-Settings.ini (Files software settings, DO NOT TOUCH THIS TIME)
-Sound.wav (audio file used by Spynet when one of your client connects)
-SpyNet.exe (executable Spynet)
Open a web page and log in here: http://www.no-ip.com/Ce site allows you to create a DNS that will be clean. This is because many, your box / router (Livebox, Freebox etc ...) Change of IP every 24 hours, and thanks to this website (NOIP) you can create a dns that will always be the same despite your ip changes. eg votrenom.no-ip.biz.Pour short, the DNS allows, when you want to connect to a client after the server is installed on his pc, to bring back the information to your pc.CREATION ACCOUNT NOIP: Look at this tutorial well done to download the software, then create your account NOIP and configure it on your pc.
http://www.youtube.com/watch?v=Nh7K9wgT22g
LAUNCH SPYNET.EXE: - Run, having many disabled your antivirus before (because Spynet is seen as a Trojan by antivirus).
- The software starts. Make start (top left), note that the software is in Spanish.
- To put it in ENGLISH, follow the procedure to the letter:
* Close the program, go to the folder RAT Spy-Net 2.6 Can Settings.ini in the folder, and the line: languages, replace default.ini with the full path of the file in the folder English.ini Spt-Net_RAT_v26.
ex: C: Documents and Settings NAME OF YOUR SESSION Path where you placed your file Spy-Net Rat 2.6 Spy-Net 2.6 RAT language English.ini
example: C: Documents and Settings Manu session Desktop Spy-Net Rat 2.6 Spy-Net 2.6 RAT language English.ini
* Restart Spynet.exe, it should be in English now. (If not, check that you did not make a mistake in the line to edit).
- Please, Select Options and Listening Ports.
-Enter the ports 80, 81, 82, 83 and SAVE do.
-Make: File, Create Server, and then NEW
 |
| www.ultimate-hacker.blogspot.com |
* Votrenom.no-ip.biz: 80 ok and then do the same for the ports 81,82,83.
eg jojo.no-ip.biz: 80
jojo.no-ip.biz: 81
jojo.no-ip.biz: 82
jojo.no-ip.biz: 83

 http://www.ultimate-hacker.blogspot.com/
* In the "File Name", note what you want! eg "explorer.exe" (this is the name under which processes will be installed SPYNET.EXE.
* No injection (if you do not want the injection to a process already exists)
* Persistence
- Create Server tab, check:

__________________
* Make "Create server".
Here is your server is now created.
This does not mean that everything works.
___________________
IMPORTANT
___________________
We must now open your ports on your box (Livebox, Freebox etc ...)
Above all, depending on whether you connect to your box by Ethernet or WiFi, I advise you to put a fixed IP on your network card.
eg if your box has the IP: 192.168.1.1
return to your network card the following values:
In your box now going to open ports 80 and 83 in TCP and UDP to the fixed IP address for your network card (192.168.1.26). ie open port 80 to 83 in TCP / UDP to 192.168.1.26.
If you do not have fixed IP to your network card, your box will know how to bring that information to your client?
this is what it is to set a fixed IP.
COMPLETION
___________________
It only remains for you to send your server SpyNet who you want: @ your MSN contacts etc ...
I created this tutorial to help, but having slaved myself to set it up to the end, so I share my knowledge.
Good luck
Available link for download
Subscribe to:
Posts (Atom)